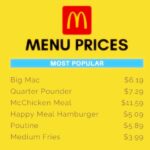
McDonald’s Menu Prices In Canada – March 2024
Are you looking for the latest and most accurate information on McDonald’s menu prices with calories in Canada? Do you want to know how much …

Are you looking for the latest and most accurate information on McDonald’s menu prices with calories in Canada? Do you want to know how much …

McDonald’s Menu Prices with Calories Update 2024, McDonald’s is more than just a fast-food restaurant – it’s a symbol of good times and tasty meals. …
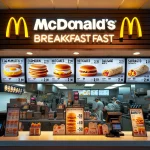
Step into your day with McDonald’s breakfast, a menu that promises both variety and value, ensuring that every morning can start with a satisfying meal. …

Step into the world of McDonald’s during happy hour, and you’re greeted with a delightful array of menu options that promise both taste and value. …
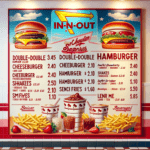
In-N-Out Burger has been serving up fresh, made-to-order fast food favorites since way back in 1948. Their menu is legendary – think juicy burgers, the …
Dairy Queen is best known for its soft-serve ice cream treats, but it also offers a tasty breakfast menu at select locations. Here’s an in-depth …

Are you looking for a satisfying and affordable lunch option that doesn’t compromise on quality and taste? If so, you might want to check out …

McDonald’s is one of the most popular fast-food chains in the United States and around the world. With many classic favorites and new additions to …
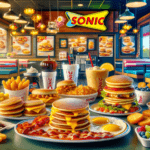
Sonic is a fast-food chain that offers a variety of delicious and affordable breakfast items. Whether you are looking for a classic breakfast sandwich, a …

Burger King is a popular fast-food chain known for its flame-grilled burgers and diverse menu. However, Burger King also offers a tasty and affordable breakfast …